This post shows best-practices when setting up an AWS account landscape from scratch. The main focus will be the types of AWS accounts required for separation of concerns, ease of management and security in various different aspects. It will be followed up with AzureAD single sign-on and full automation via Terraform and how to actually use it on an every-day basis over the command line or AWS web-ui.
- AWS Account Structure
- Single Sign-On with SAML
- Link AWS accounts
- Usage
- Terraform
- Terragrunt
Overview:
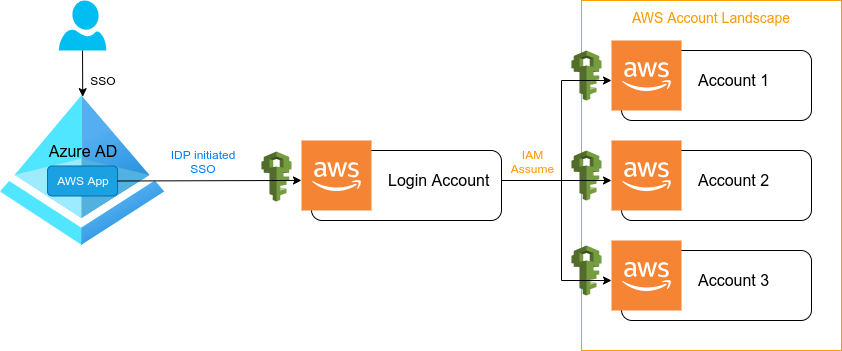
The final goal of this series will be a fully automated setup (at least on the AWS side) with Terraform or Terragrunt of your AWS login which will look similar like in the graphic shown below. But before diving into this, let’s talk about AWS accounts first (which is represented on the right side).
Disclaimer:
The given example is from my own experience. So please do let me know about your experiences and best-practices, so we can all learn together. Additionally to mention, this tutorial series is not using the AWS Organizations service, which will be part of another series later on.
Account Overview
Let’s assume you are tasked to setup a complete AWS multi-account landscape with Single Sign-On via AzureAD from scratch. How would you start? Do you even need more than one account and if so, how many AWS accounts would you need?
To start off, I would definitely recommend separating your various stages of environments into different AWS accounts. This will ease your future configuration and potential mistakes when it comes to routing tables, security groups, ACL’s and even more importantly: IAM permissions.
Required AWS accounts
Of course all that depends on the use-cases, expected growth of the Engineering teams and potential projects. There are basically two scenarios that come to my mind immediately.
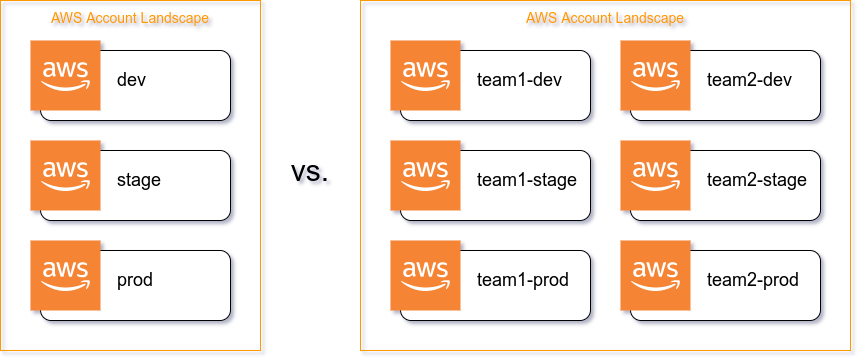
A. One big project
Your company is managing one big project and you need to ensure there is separation of concerns, so you would eventually need the following AWS accounts:
dev– Engineers can freely develop herestage– QA and Sec is running automated tests here, product is approving/declining featuresprod– The production account the customer is interacting with
And just for the sake, of course you could also add test, qa, sandbox or whatever other environment is required.
B. Multi-team
You have multiple teams working on different projects and you want them to work totally independent of each other, while taking full ownership of their AWS accounts.
Team one would have their own set of AWS accounts:
team1-devteam1-stageteam1-prod
Team two would also have their own set of AWS accounts:
team2-devteam2-stageteam2-prod
This scenario might also come in handy, even if the teams work on a single project, but have ownership of different services that require a separation. It is most likely also more future proof in case you will separate a single team later down the road. Try to think one or two years ahead.
Additional AWS accounts
The above listed accounts would so far only satisfy the needs for Engineers to develop, test and release. That however is not all you want, you want more! Consider just a few questions:
- Where can Engineers try out new services without poluting their accounts?
- Where do you run isolated CI tests for infrastructure modules?
- Where do you keep secure backups and audit trails?
- How do you connect resources between accounts together?
- What about shared resources that don’t fit specifically into any of the staged accounts?
- Where do you login – in each account separately?

The playground AWS account
You can laugh about this approach or not, but bare with me for a moment.
Having a dedicated account, which only purpose is to play around with AWS itself, testing out new services or screwing things up intentionally has indeed many advantages.
First of all, you could always auto-wipe this account every day at midnight to ensure people do not go crazy on the costs by accidentally forgetting to delete stuff themselves that they used to play around with. This might save you many awkward meetings explaining yourself about your AWS budget.
Secondly, this account is fully separated from the rest of your infrastructure, so you can grant elevated rights without compromising any of the other important environments. You can save up so much Jira bandwidth by getting rid of the everlasting game of “Engineer opened ticket and asked for more permissions” -> “Ops closed ticket with: won’t do due to x, y, z”. Save yourself from tickets and give something back to your Engineers: permissions :-)
Another point is that you can actively encourage people to try out AWS and get more comfortable with it, without having to fear to screw things up on their dev accounts which might only allow fully automated CI pipelines. Let them have some fun.
The ci AWS account
If you keep infrastructure as a code – and you should, you probably want a dedicated AWS account to be able to run integration tests on whatever role, module or plugin you are developing. You really should make this a separate account to not have your CI accidentally destroy whatever resources you have intentionally provisioned on AWS. We are all humans and we do make mistakes.
The backup AWS account
This is your get-out-of-jail free card. If wind hits the fan, this account with lowest permissions possible is going to give you back your precious data. Make security as tight as possible and give least required permissions here if needed at all (of course some one needs it for recovery purposes). This is the place that will store your mid- and long-term backups.
Why not put backups in each of the accounts they belong to?
Let’s face it, IAM permissions are complex and you could easily give out too many of them and all of a sudden someone has write access to an S3 bucket who shouldn’t have. Your automation tools such as atlantis (or whatever it might be) could also have too many permissions by default and someone might gain access via automated pipelines. There are just so many unthinkable cases to gain access to certain resources if there is just a single mistake somewhere down the chain.
Just put your backups into a completely isolated account. You will have much better sleep in the end – at least I do.
The secure AWS account
You don’t want to leave your landscape without a trail! This is the place that will accumulate all kinds of audit trails and keep them secure. Similar to the backup account, it will have lowest permission possible. Keep your Cloudtrail data from all other accounts here, add K8s audit logs and similar things. Ensure to keep security as tight as possible and just process it further by pushing it into Elastic Search or other services in the common account.
The common AWS account
Teams can work independently and you are starting to ask yourself: Where should you host your monitoring tools and all other supportive services that more than one team is using?
Well, that’s why it is called the common account. Add your shared resources here. That’s it.
The connect AWS account
Your landscape is in place, it has multiple accounts with multiple resources (e.g.: separated VPC’s), your monitoring infrastructure is awating logs and metrics and now all of a sudden they all actually need to talk to each other. We should have known earlier. And then there is this guy who wants to have MySQL access to one of the RDS’s in a private subnet. What have you gotten yourself into?
AWS Transit Gateway to the rescue! This AWS account’s only purpose is to securely connect VPC’s from different accounts together and maintain the routing tables. Consider it as your single source of truth when it comes to network security. Each of the VPC’s in the *dev, *stage and *prod can request a peering to your TGW here and you can accept or decline it.
It might also be worth considerint to have multiple TGW’s. One for each of the different environments. This will not only allow to keep a more secure isolation, but more importantly to try out new routing changes on a non-prod environment first.
You can then attach a VPN here, link it to the Transit Gateway(s) and you are set and ready to go.
The login AWS account
You did it! Accounts have been set up, but how on earth are you gonna manage all that access? Oh boy, that is gonna be a nightmare… or is it?
The magic word to cleanly and securly manage access is assume. There is only a single purpose for this account and also only a single permission required in here: sts:AssumeRole.
Everybody will be using this account to login into AWS (either on the web ui or via command line). For that to work, you will have to set up all the different login IAM roles which will be allowed to assume further into the respective AWS accounts. Nobody should be able to interact with this account by any other means.
At this point you don’t need to be concerned with specific permissions, only with potential different levels of access. As an example you could divide them into something like this:
- LOGIN-ADMIN
- LOGIN-TEAM1-LEAD
- LOGIN-TEAM1-OPS
- LOGIN-TEAM1-ENGINEER
- LOGIN-TEAM1-PRODUCT
- LOGIN-TEAM1-EXTERNAL
- LOGIN-TEAM1-CI
- …
We will be discussing the above proposed roles in way more detail with real-world examples in the coming posts of this series.
Word of wisdom
As I am also just an Engineer, I struggle as much with naming things as you guys might do, so when it comes to giving names to your AWS accounts, be creative :-)
And please, leave some of the cool names for S3 buckets free, I have already wasted so many days and nights…
TL;DR
OK and there we have it: Enforce separation of concerns right from the start and plan for future growth.

.
Pingback: AWS Single Sign-On with AzureAD: Single Sign-On with SAML - Everything CLI
Pingback: AWS Single Sign-On with AzureAD: Link AWS Accounts - Everything CLI