How to safely log into other AWS accounts from within a single AWS login account? The third part of the series goes over the specifics of cross-account assumable IAM roles. Additionally it will cover IAM permissions as well as permission boundaries in great detail. This is going to be the glue that will magically link together the effort spent in part 1 and 2 of this series.
- AWS Account Structure
- Single Sign-On with SAML
- Link AWS accounts
- Usage
- Terraform
- Terragrunt
Goal
The goal of this post is to be able, once logged into the AWS login account via Azure AD, to assume other roles in the same or different AWS accounts that are specifically made for your level of required permissions. So first we are going to define what permissions per company role per AWS account is required and then we will be spending the rest of the time going over IAM roles and policies. So in human speak, we will be creating lots of IAM resources. And trust me, this is a thankless and time-consuming job without any automation in place
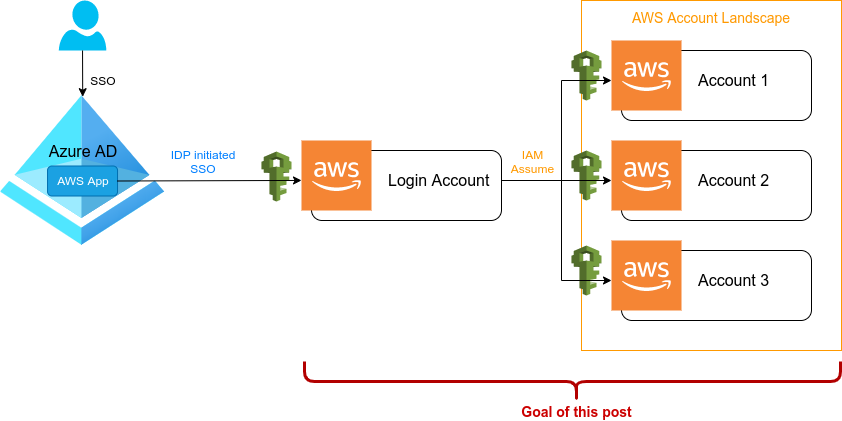
To also show the complete picture with a little recap on what we have done, the following table will give some clarity on how a user goes from Azure AD over the AWS login role to its final assumable role with actual permissions in any of the desired AWS accounts.
| Azure AD group | AWS login role | AWS account-x[1] role |
|---|---|---|
| AWS-ADMIN | LOGIN-ADMIN | ASSUME-ADMIN |
| AWS-TEAM1-LEAD | LOGIN-TEAM1-LEAD | ASSUME-TEAM1-LEAD |
| AWS-TEAM1-OPS | LOGIN-TEAM1-OPS | ASSUME-TEAM1-OPS |
| AWS-TEAM1-ENGINEER | LOGIN-TEAM1-ENGINEER | ASSUME-TEAM1-ENGINEER |
| AWS-TEAM1-PRODUCT | LOGIN-TEAM1-PRODUCT | ASSUME-TEAM1-PRODUCT |
| AWS-TEAM1-EXTERNAL | LOGIN-TEAM1-EXTERNAL | ASSUME-TEAM1-EXTERNAL |
| AWS-LOGIN-TEAM-CI | LOGIN-TEAM1-CI | ASSUME-TEAM1-CI |
[1]
account-xrefers to any of the AWS accounts you have in your landscape and you will need to create those roles in each of them.
Azure AD group
This is the SAML identity provider side which will group your users into an Azure AD group once they have logged in. These groups have a one-to-one mapping with the respective roles on the AWS login account. In other words, users of a group in Azure AD are allowed to assume the corresponding login role in AWS. Keep in mind that user-to-group is a one-to-many mapping, meaning that one user could be part of multiple Azure AD groups and thus be allowed to assume multiple AWS login roles.
AWS login role
This is the SAML service provider side which allows authorized users coming from Azure AD to assume a specific login role. On AWS side it was achieved by adding a SAML identity provider (Azure AD) and assigning that as the trusted entity to each of these roles. The login roles itself do not have any permissions on AWS (except sts:AssumeRole) as we sadly discovered at the end of the last post. This is also the point our story ended last time.
AWS account-x role
Starting with this post of the series, we finally have Azure AD out of the way and will be staying solely on AWS. Remember the first post on this series where we talked about all the different AWS accounts? Each of these accounts will need to have those IAM roles available. So there is gonna be a lot of mouse-clicking and copy&paste ahead of you.
Those roles will define the actual permissions for each account, so you might attach a policy such AdministratorAccess to the ASSUME-ADMIN role or the PowerUserAccess policy to the ASSUME-TEAM1-LEAD role, etc.
And then finally we need to somehow allow those roles to be assumed from the roles of the AWS login account (spoiler: trusted entity). Also worth to mention that this is going to be a one-to-many mapping, which means that a single login role could assume multiple account-x roles in each of the other AWS accounts.
Table of Contents
- Prerequisits
- More on IAM
- Create boundaries
- Create policies
- Create and link Roles
- TL;DR
- References
1. Prerequisits
What is a trusted entity?
Trusted entities in AWS speak are one or more entities that are allowed to assume an IAM role. A role, unlinke a user, is not something you can log into, you can only “assume” it. So there must be a way of telling what entity is allowed to “assume” it.
In the previous blog post, we have set the trusted entity for the login roles to our Azure AD SAML provider. So everybody logged in via Azure AD with the right group-to-role mapping was allowed to “assume” that role.
In this blog post, our trusted entity for the account-x roles which will hold the actual permissions are the AWS login rolles. So everybody who “assumed” a login role will be allowed to assume the account-x role. So our trusted entity will look similar to this: arn:aws:iam::1234567890:role/LOGIN-ADMIN.
Apart from our scenarios, there can also be other entities that would want to assume a role, such as Lambda or an EC2 instance, etc.
Order of creation matters !!!
If you add a trusted entity to a role, this trusted entity must already exist, otherwise AWS won’t let you create this role. This is the reason why you will need to create all login roles first.
Warning and burn this into your brain:
If for any reason your AWS login roles get destroyed or even just re-created, all your other roles that allow to be assumed by that login role will stop working. AWS will even automatically change the trusted identity on those assumeable roles to arn:aws:iam::1234567890:root, meaning that only the root user from the login account will be allowed to assume that role. And this will be the case for all your 20+ AWS accounts, so ensure to have automated provisioning in place (and also drift detection to monitor).
Can we go over mappings again?
OK, let’s quickly recap this:
- AD user -> AD group: one-to-many
- AD group -> AWS login role: one-to-one
- AWS login role -> AWS account-x role: one-to-many
We can simply ignore the AD group to AWS login role mapping as it is just a one-to-one relation, so there is nothing you can change here.
The attentive reader will already know where this is going and what this will mean: Yes, you will have to make a choice!
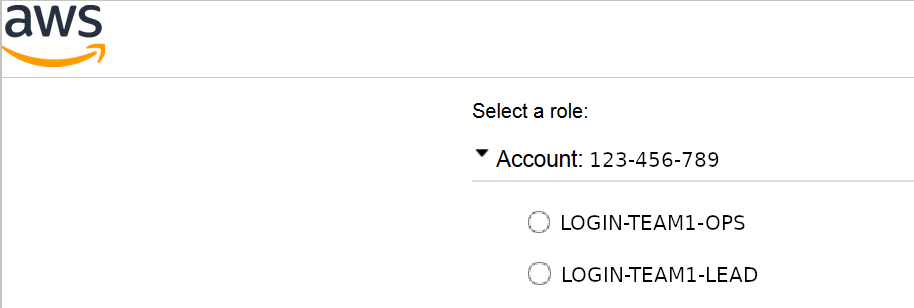
If you assign an Azure AD user to the Azure AD group AWS-TEAM1-OPS, that user will be able to assume the AWS login role LOGIN-TEAM1-OPS and from there move ahead and assume the ASSUME-TEAM1-OPS role in any of the other accounts.
user1 ----> LOGIN-TEAM1-OPS ----> ASSUME-TEAM1-OPS
If however you assign that Azure AD user to two Azure AD groups, let’s say AWS-TEAM1-OPS and AWS-TEAM1-LEAD, that user is then able to also assume both AWS login roles and thus two corresponding roles in all other accounts.
        ---->  LOGIN-TEAM1-OPS   ---->  ASSUME-TEAM1-OPS
      /
user1 \
        ---->  LOGIN-TEAM1-LEAD  ---->  ASSUME-TEAM1-LEAD
Here is the choice you will have to make. You can achieve exactly this also via AWS by allowing the login role LOGIN-TEAM1-OPS to assume ASSUME-TEAM1-OPS and ASSUME-TEAM1-LEAD in all other AWS accounts.
                                 ---->  ASSUME-TEAM1-OPS
                               /
user1   ---->  LOGIN-TEAM1-OPS \
                                 ---->  ASSUME-TEAM1-LEAD
And then of course, your second sight already predicted it, you can mix things up :-)
        ---->  LOGIN-TEAM1-OPS     ---->  ASSUME-TEAM1-OPS
      /
user1 \
       \                           ---->  ASSUME-TEAM1-LEAD
         ----> LOGIN-TEAM1-LEAD  /
                                 \
                                   ---->  ASSUME-TEAM1-PRODUCT
And for those who don’t just skim over the whole post, I’m going to tell you what to use and why this will make your life and everyone elses life way easier. Especially when it comes to the usage scenarios (which will be covered in detail in a follow up post):
Make the one-to-many mapping on AWS! And here goes why:
First of all, everything is glued into terraform or terragrunt (at least once we come to this part in future blog posts) and therefore it is auditable by looking at the code. Secondly it is reproducible and reviewable as you were a good guy and have IaC and pull request any changes that concern permissions. And to be honest, you never know what the Azure AD department will mouse-click together if they have a heavy week again.
Most important of it all is the usability. If you are doing it the Azure AD way, then before entering the AWS account, you first will need to select the role you are going to use on AWS. If that role only has a one-to-one mapping for assuming an account-x role, you will have to log out and log in again when you want to switch roles.
Doing it the AWS way let’s you simply assume a different role while staying logged in. This is going to save you a lot of pain on both, the web ui and the command line. More on that in the next blog post.
Summary
We know what trusted entities are, what of them need to be attached to login and account-x roles and why. We also know that login roles must be created before account-x roles and that we are going to make a one-to-many mapping on AWS side rather than on Azure AD.
2. More on IAM
Finally we have all that theory out of the way and it is time to roast your mouse by clicking your way through all your 20+ AWS accounts. So let the fun begin.
But actually, hang on :-) We still have a few things to consider and to explain. Are you going to use AWS managed, custom or inline policies? And do you plan to attach a permission boundaries as well? What about organizing your roles and policies in a tree-like path structure?
AWS managed policies
These are pre-configured policies that already exist in every AWS account and are managed by AWS. You can attach them to any of your defined roles in order to grant permissions.
If you plan on using them, keep an eye on the mailing list as AWS changes their permissions in managed policies from time to time.
- Managed policies per IAM role: 10 (20 if you increase the limit)
Customer managed policies
These are the custom policies that you would create. Policies are managed and defined by you and you could fine-tune them to your likings. You can attach them to any of your defined roles in order to grant permissions.
- Number of customer managed policies per AWS account: 1500 (5000 if you increase the limit)
- Managed policies per IAM role: 10 (20 if you increase the limit)
- Character limit: 2,048 characters (including whitespace)
Inline policies
One inline policies is attached directly to a single role. They don’t exist anywhere else in AWS except on the role you have attached them. So it is a one-to-one mapping and you cannot re-use them with other roles. I would not recommend using them as you will need to repeat a lot of code. The only advantage that comes to my mind is the greater character length, but you could just attach multiple policies and get around that length limit.
- Inline policies per IAM role: 1
- Character limit: 10,240 characters (including whitespace)
Permission boundaries
A permission boundary from AWS’s perspective is just a policy. You can take any AWS managed or customer managed policy and attach it as either a policy or as a permission boundary. If attached as a permission boundary, it determines the highest possible permission that is allowed, even if an attached policy grants higher permissions.
Both, the permission boundary and the attached policies will define allowed permissions, which a role (or user, group, etc) can have on AWS.
a: perm boundary    b: policy
    ______           ______
  /        \       /        \
 /          \     /          \
|     a      |   |     b      |
 \          /     \          /
  \ ______ /       \ ______ /
However, only permissions defined in both, the boundary and the policy are the actual effective permissions (only the intersection set).
a: perm boundary
b: policy
c: effective permission
    _____  ______
  /     /  \      \
 /     /    \      \
|  a   |  c  |  b   |
 \      \   /      /
  \ ____ \/ ______/
Using permission boundaries is good practice and it will save you from writing and repeating lots of “allow this, but in here just deny this little thing”.
Think of permission boundaries as blacklists and policies as whitelists. In the boundary you are first going to allow everything and then step-by-step deny what should never be allowed. The policy on the other hand will step-by-step define what can be allowed. (Yes, don’t nail me on this one, policies can also have deny statements, but leveraging boundaries will make it even easier).
For a more practical example consider a team that you want to grant full write access to the S3 service. They should be fully enabled and all that buzz. But, turns out you have your holy Terraform state bucket there and also your precious HashiCorp Vault backend storage that nobody should dare to touch. Simply asking them is not gonna be enough, you need to enforce it by algorithm!
{
    "Version": "2012-10-17",
    "Statement": [
        {
            "Sid": "AllowAll",
            "Effect": "Allow",
            "Action": "*",
            "Resource": "*"
        },
        {
            "Sid": "DenyS3Partially",
            "Effect": "Deny",
            "Action": "s3:*",
            "Resource": [
              "arn:aws:s3:::my-holy-terraform-state-backend",
              "arn:aws:s3:::my-precious-vault-storage-backend"
            ]
        }
    ]
}
With the above listed permission boundary attached to a role, even if that role has the AdministratorAccess policy attached, nobody is going to mess with your stuff anymore.
You probably want to go ahead and add more sane defaults, such as denying write access on Cloudtrail, IAM and other sensitive services. Add some effort into this, you will only have to do this once and can re-use it.
And then you get the idea, you can say “no” more easily and even without repeating yourself.
- Permission boundaries per IAM role: 1
- Character limit: 10,240 characters (including whitespace)
To dig even deeper have a look here: https://docs.aws.amazon.com/IAM/latest/UserGuide/access_policies_boundaries.html
The path
Important: It seems not possible to set a custom path via the AWS web ui (at least at the time this blog post was written). In order to set a path for groups, users, roles or policies you will have to use automation tools such as aws cli, Terraform, Cloudformation or others.
AWS resources such as IAM groups, users, roles and policies are created by the following ARN structure:
arn:aws:iam::1234567890:group/<GROUP-NAME>
arn:aws:iam::1234567890:user/<USER-NAME>
arn:aws:iam::1234567890:role/<ROLE-NAME>
arn:aws:iam::1234567890:policy/<POLICY-NAME>
Whatever comes after group, user, role or policy and just before their names is the path. In the above case the path is simply /.
You can also neatly arrange your resources by any clever path structure that satisfies your OCD.
And you probably should, because then you can use a wildcard path in your policies or permission boundaries when refering to them, to allow or deny path-grouped resources.
arn:aws:iam::1234567890:role/federation/login/LOGIN-ADMIN
arn:aws:iam::1234567890:role/federation/assume/ASSUME-ADMIN
Or when it comes to policies, you can already make it visible in the path, to determine if that policy is just a policy or a permission bundary:
# group your policies
arn:aws:iam::1234567890:policy/custom-policies/let-me-s3
arn:aws:iam::1234567890:policy/custom-policies/what-the-bill-say

# group your permission boundaries
arn:aws:iam::1234567890:policy/boundaries/regluar-engineers
arn:aws:iam::1234567890:policy/boundaries/guys-who-demand-too-much-from-ops
arn:aws:iam::1234567890:policy/boundaries/hide-costs-from-manager
You can also have nested paths, but keep in mind that there are limits to the character length as well:
- Path: 512 characters
Important: If you intend to use a role with the Switch Role feature in the AWS console, then the combined Path and RoleName cannot exceed 64 characters.
Summary
We’ve learned the basics about policies, their limits, the difference to permission boundaries and that the AWS web ui is lacking a feature to set paths (this is probably not the only feature that thing is lacking).
3. Create boundaries
Let’s go ahead and create some sane permission boundaries. For this example we will trust admins and ops and don’t force a boundary onto them. Additionally we will have two different boundaries. One for CI and one everyone else.
The permission boundaries should actually be created under the path /boundaries/ for easier reference in policies, but as this post is only going to show how to accomplish it manually via the AWS ui, we actually won’t be able to set a path (thanks AWS). Never mind this, I imagine you are not actually following the manual stuff as you have 20+ accounts ahead of you. This part is only for the theory, so wait for the Terraform / Terragrunt post.
| AWS account-x role | Permission boundary |
|---|---|
| ASSUME-ADMIN | none |
| ASSUME-TEAM1-OPS | none |
| ASSUME-TEAM1-LEAD | /boundaries/default |
| ASSUME-TEAM1-PRODUCT | /boundaries/default |
| ASSUME-TEAM1-ENGINEER | /boundaries/default |
| ASSUME-TEAM1-EXTERNAL | /boundaries/default |
| ASSUME-TEAM1-CI | /boundaries/ci |
AWS account
The mindful reader might ask: in what AWS account are we going to create those boundaries?
Sorry to inform you, but you will have to create those boundaries in all your AWS accounts, except for the login account itself.
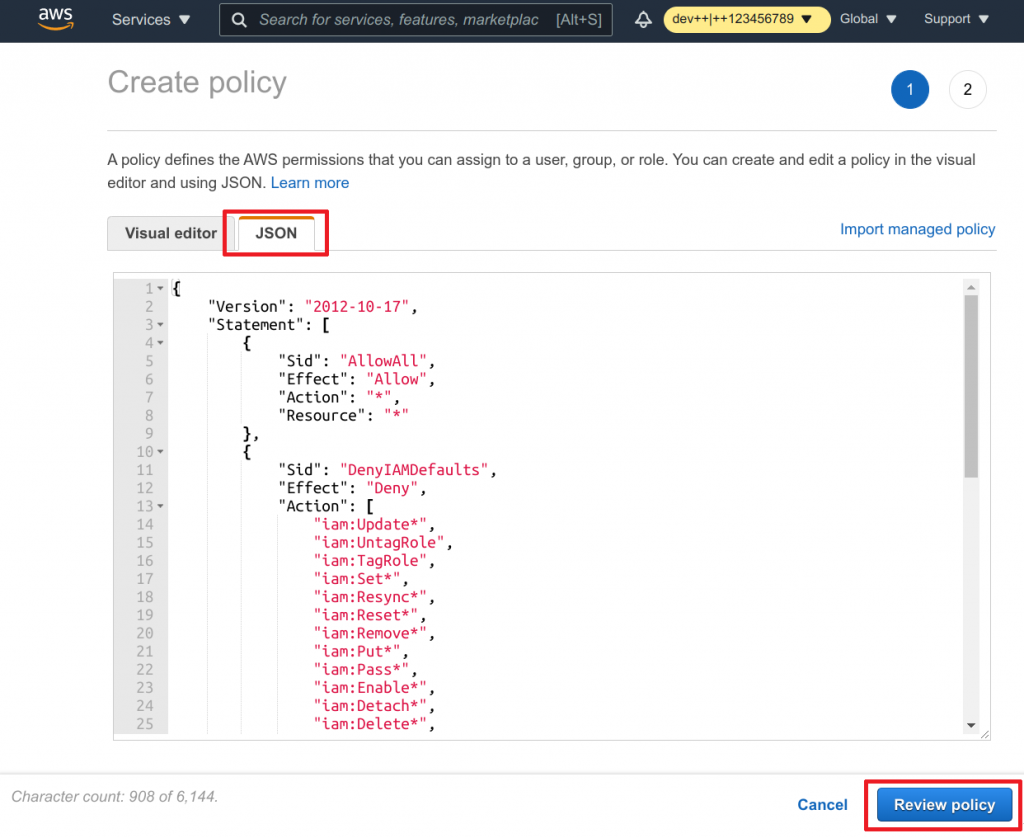
/boundaries/default
“Sid”: “AllowAll”
This is used to allow everything. Remember, the effective permissions will be determined by the intersection set of the boundary and the policy. So in order to achieve our blacklisting, we first have to give all possible permissions and will then start to deny step-by-step.
“Sid”: “DenyIAMDefaults”
This is our actual blacklisting. And this is going to be easy, because we have organized everything nicely in a path-based structure, haven’t we AWS? What we definitely want to deny is the tampering with our permission boundary itself as well as the login or account-x roles. This would allow us to even assign administrative permissions later, but yet all roles with this permission boundary will not be able to free themselves from those limitations.
“Sid”: “DenyTerraform*”
Let nobody mess with our Terraform stuff…ever!
{
    "Version": "2012-10-17",
    "Statement": [
        {
            "Sid": "AllowAll",
            "Effect": "Allow",
            "Action": "*",
            "Resource": "*"
        },
        {
            "Sid": "DenyIAMDefaults",
            "Effect": "Deny",
            "Action": [
                "iam:Update*",
                "iam:UntagRole",
                "iam:TagRole",
                "iam:Set*",
                "iam:Resync*",
                "iam:Reset*",
                "iam:Remove*",
                "iam:Put*",
                "iam:Pass*",
                "iam:Enable*",
                "iam:Detach*",
                "iam:Delete*",
                "iam:Deactivate*",
                "iam:Create*",
                "iam:Add*"
            ],
            "Resource": [
                "arn:aws:iam::*:role/federation/*",
                "arn:aws:iam::*:policy/boundaries/*"
            ]
        },
        {
            "Sid": "DenyTerraformStateStore",
            "Effect": "Deny",
            "Action": "s3:*",
            "Resource": "arn:aws:s3:::terraform-state-backend"
        },
        {
            "Sid": "DenyTerraformStateLock",
            "Effect": "Deny",
            "Action": "dynamodb:*",
            "Resource": "arn:aws:dynamodb:*:*:table/terraform-state-backend"
        },
        {
            "Sid": "DenyTerraformStateEncryption",
            "Effect": "Deny",
            "Action": "kms:*",
            "Resource": [
                "arn:aws:kms:eu-central-1:1234567890:key/abcdef123-abcd-0000-1111-1234567890ab",
                "arn:aws:kms:*:*:alias/terraform-state-backend"
            ]
        }
    ]
}
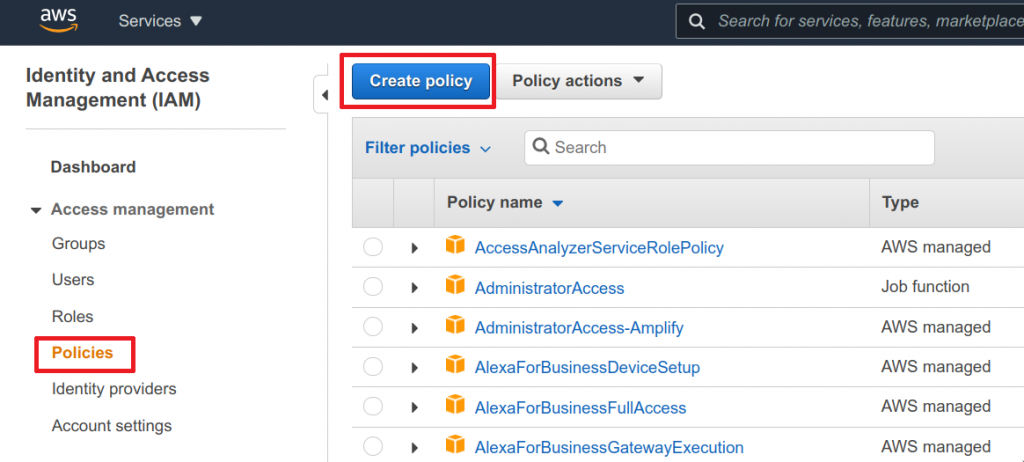
- Head over to IAM service on AWS
- Click on Policies in the left navigation
- Click on Create policy (Remember: a permission boundary is simply a policy)
- Switch to the JSON tab
- Paste the above shown policy
- Click on Review policy
- Enter the name and description
- Review your policy
- And click on Create policy
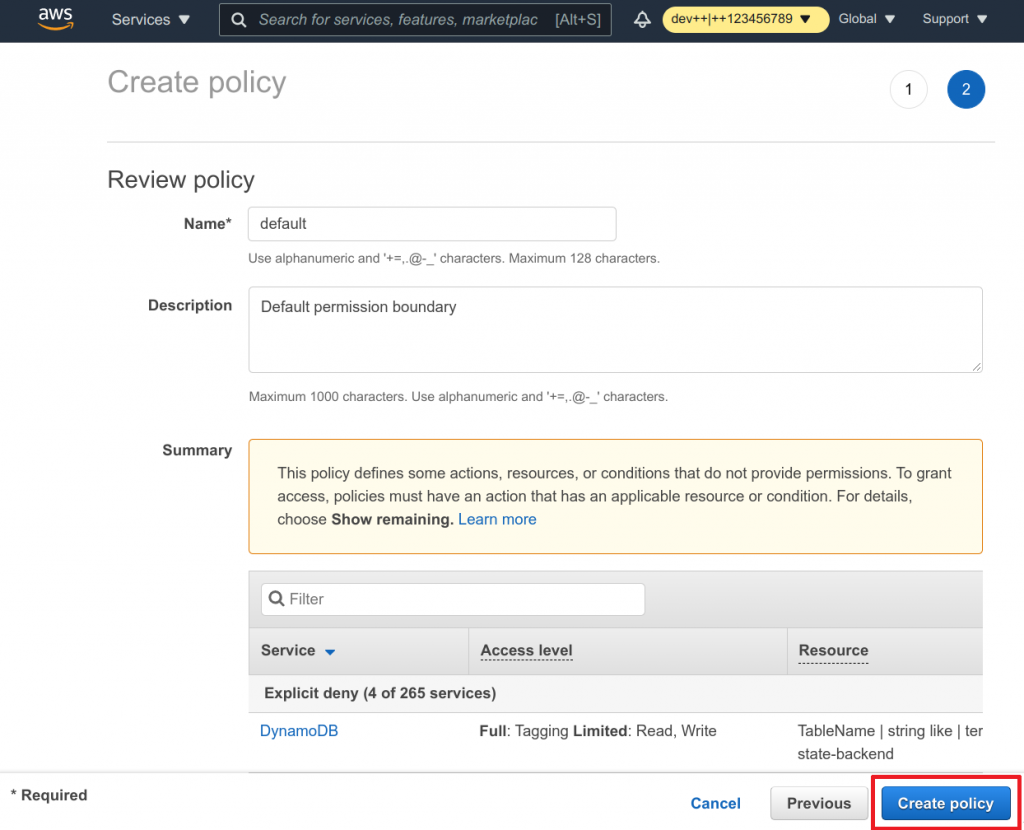
Well well, you have your first boundary in place.
/boundaries/ci
This is pretty much the same policy as the first one we’ve created, except we are not going to deny our Terraform required resources. In the end we want our CI role to execute Terraform, don’t we.
{
    "Version": "2012-10-17",
    "Statement": [
        {
            "Sid": "AllowAll",
            "Effect": "Allow",
            "Action": "*",
            "Resource": "*"
        },
        {
            "Sid": "DenyIAMDefaults",
            "Effect": "Deny",
            "Action": [
                "iam:Update*",
                "iam:UntagRole",
                "iam:TagRole",
                "iam:Set*",
                "iam:Resync*",
                "iam:Reset*",
                "iam:Remove*",
                "iam:Put*",
                "iam:Pass*",
                "iam:Enable*",
                "iam:Detach*",
                "iam:Delete*",
                "iam:Deactivate*",
                "iam:Create*",
                "iam:Add*"
            ],
            "Resource": [
                "arn:aws:iam::*:role/federation/*",
                "arn:aws:iam::*:policy/boundaries/*"
            ]
        }
    ]
}
I will also leave out the pictured step-by-step guide assuming you can apply it just fine.
Summary
We have created two policies that will act as permission boundaries later on. And those policies have now been create in all AWS accounts.
4. Create policies
For simplicity we could just use AWS managed policies and attach them to our roles. But let’s not get ahead of ourselves and actually also create some useful policies as well. So we want to end up with something like this later on:
| AWS account-x role | Policy |
|---|---|
| ASSUME-ADMIN | arn:aws:iam::aws:policy/AdministratorAccessarn:aws:iam::aws:policy/custom/rds-access |
| ASSUME-TEAM1-OPS | arn:aws:iam::aws:policy/AdministratorAccessarn:aws:iam::aws:policy/custom/rds-access |
| ASSUME-TEAM1-LEAD | arn:aws:iam::aws:policy/AdministratorAccessarn:aws:iam::aws:policy/custom/rds-access |
| ASSUME-TEAM1-PRODUCT | arn:aws:iam::aws:policy/ReadOnlyAccessarn:aws:iam::aws:policy/custom/billing-ro |
| ASSUME-TEAM1-ENGINEER | arn:aws:iam::aws:policy/PowerUserAccessarn:aws:iam::aws:policy/custom/rds-accessarn:aws:iam::aws:policy/custom/billing-ro |
| ASSUME-TEAM1-EXTERNAL | arn:aws:iam::aws:policy/PowerUserAccessarn:aws:iam::aws:policy/custom/rds-accessarn:aws:iam::aws:policy/custom/billing-ro |
| ASSUME-TEAM1-CI | arn:aws:iam::aws:policy/AdministratorAccess |
We can already identify two custom policies that need to be created:
- /custom/rds-access
- /custom/billing-ro
Note: If you are actually going to create your custom managed policies, the AWS policy generator is a good starting point: http://awspolicygen.s3.amazonaws.com/policygen.html
AWS account
Yes! Again, those policies need to be created in all your AWS accounts, except for the login account itself.
/custom/rds-access
Did you know that you can actually connect to RDS instances with your IAM role? Me neither until recently. So let’s go ahead and make this possible, at least from the IAM side (thinking ahead, don’t we).
The policy itself is pretty much straight forward:
{
    "Version": "2012-10-17",
    "Statement": [
        {
            "Sid": "RDSAuthenticationAllow",
            "Effect": "Allow",
            "Action": [
                "rds-db:connect"
            ],
            "Resource": [
                "arn:aws:rds-db:eu-central-1:1234567890:dbuser:*/iam_user_rw",
                "arn:aws:rds-db:eu-central-1:1234567890:dbuser:*/iam_user_ro"
            ]
        }
    ]
}
What is left on your RDS instances is to create two users: iam_user_rw and iam_user_ro
Read more details on this here:
* https://aws.amazon.com/premiumsupport/knowledge-center/users-connect-rds-iam/
* https://docs.aws.amazon.com/AmazonRDS/latest/UserGuide/UsingWithRDS.IAMDBAuth.IAMPolicy.html
As you’ve already created permission boundaries, which are in fact policies in your 20+ accounts, I will simply assume you are quite familiar with the actual creation process, so I am going to leave out the picture series here.
/custom/billing-ro
Not everybody might be retrieving a policy that would allow them to view the billing and if people shall take ownership of their accounts, they probably also want to throw an eye or two on how much they’re spending. The AWS managed policy for billing doesn’t seem to quite hit it, so we’re going to create a read-only policy which is a little bit more permissive.
{
    "Version": "2012-10-17",
    "Statement": [
        {
            "Sid": "BillingReadOnly",
            "Effect": "Allow",
            "Action": [
                "account:ListRegions",
                "aws-portal:View*",
                "awsbillingconsole:View*",
                "budgets:View*",
                "ce:Get*",
                "cur:Describe*",
                "pricing:Describe*",
                "pricing:Get*"
            ],
            "Resource": "*"
        }
    ]
}
Summary
We have again created two policies in all AWS accounts. One that might allow people access to RDS instances via their IAM role and another one that grants access to the spendings of an account.
5. Create and link Roles
This section will link everything together. We are going to create roles, add permission boundaries and policies to them and will then finally set the trusted entity to make it assumable.
We’re also going to make our initial example a little bit more sophisticated by leveraging this one-to-many mapping:
| AWS login role | AWS account-x[1] role |
|---|---|
| LOGIN-ADMIN | ASSUME-ADMIN ASSUME-TEAM1-OPS ASSUME-TEAM1-LEAD ASSUME-TEAM1-PRODUCT ASSUME-TEAM1-ENGINEER ASSUME-TEAM1-EXTERNAL ASSUME-TEAM1-CI |
| LOGIN-TEAM1-OPS | ASSUME-TEAM1-OPS ASSUME-TEAM1-LEAD ASSUME-TEAM1-PRODUCT ASSUME-TEAM1-ENGINEER ASSUME-TEAM1-EXTERNAL ASSUME-TEAM1-CI |
| LOGIN-TEAM1-LEAD | ASSUME-TEAM1-LEAD ASSUME-TEAM1-ENGINEER ASSUME-TEAM1-EXTERNAL |
| LOGIN-TEAM1-PRODUCT | ASSUME-TEAM1-PRODUCT |
| LOGIN-TEAM1-ENGINEER | ASSUME-TEAM1-ENGINEER |
| LOGIN-TEAM1-EXTERNAL | ASSUME-TEAM1-EXTERNAL |
| LOGIN-TEAM1-CI | ASSUME-TEAM1-CI |
If you enter the AWS login role LOGIN-ADMIN, you will be able to not only assume a role suited for yourself, but also everybody else’s role. This comes in very handy for troubleshooting IAM permissions. Let’s say an Engineer is unable to create Lambda’s on AWS, you can then assume the role with which he/she/it is trying and be able to figure it out… at least in theory.
This of course only makes sense for roles that have lesser permissions. You don’t want the external guys to assume any admin roles. I mean, up to you though.
AWS account
All of them!
AWS web ui
Unfortunately the UX department has yet to be hired and setting the correct trusted entity during the creation process is not possible You first need to create the role and edit it afterwards in order to assign the correct settings…
Create the role
This will be a fully guided example for:
- Azure AD group:
AWS-TEAM1-LEAD - AWS login role:
LOGIN-TEAM1-LEAD - AWS account-x role:
ASSUME-TEAM1-LEAD - Permission boundary:
/boundaries/default - Policies:
AdministratorAccessand/custom/rds-access
As mentioned above, we first need to create the role and later on edit it to set the right trusted entity.
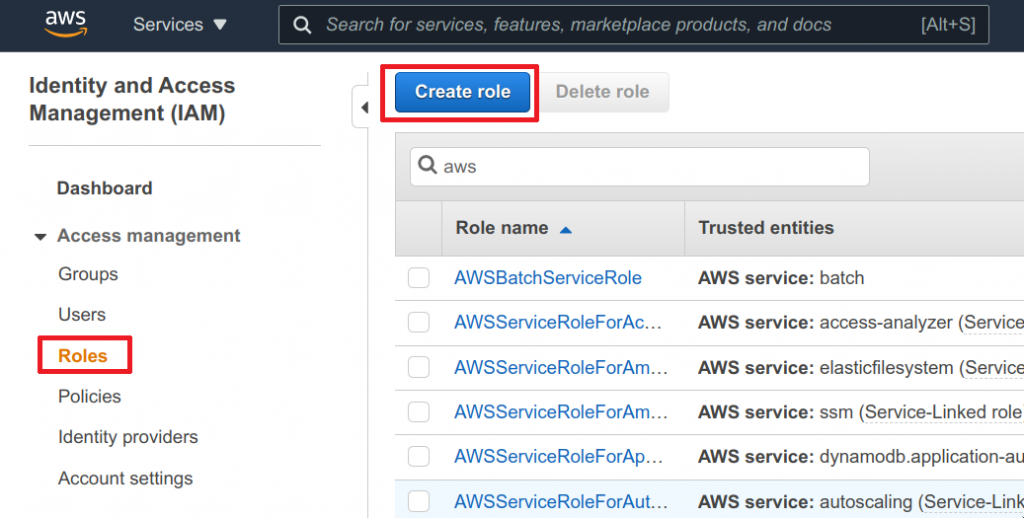
- Head over to IAM service on AWS
- Click on Roles in the left navigation
- Click on Create role
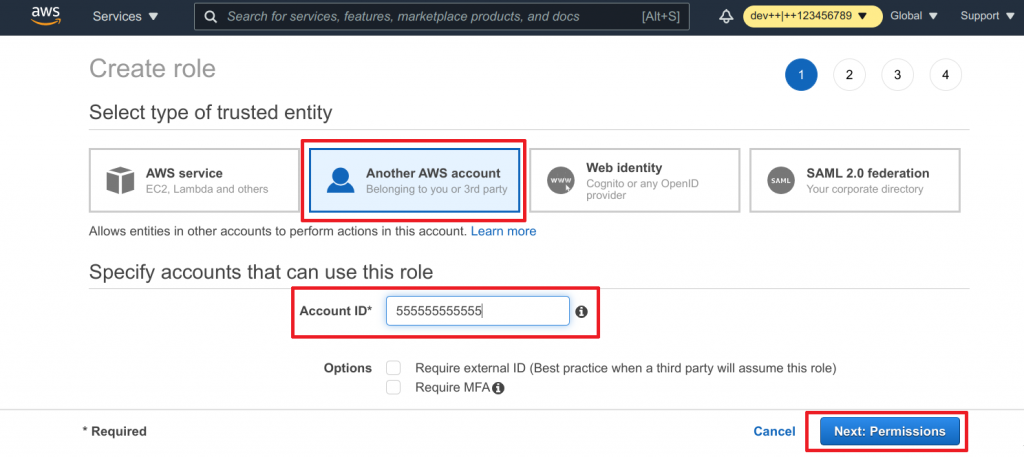
- Choose Another AWS account for our trusted identity
- Enter the account id of your AWS login account
- Click Next: permissions to continue
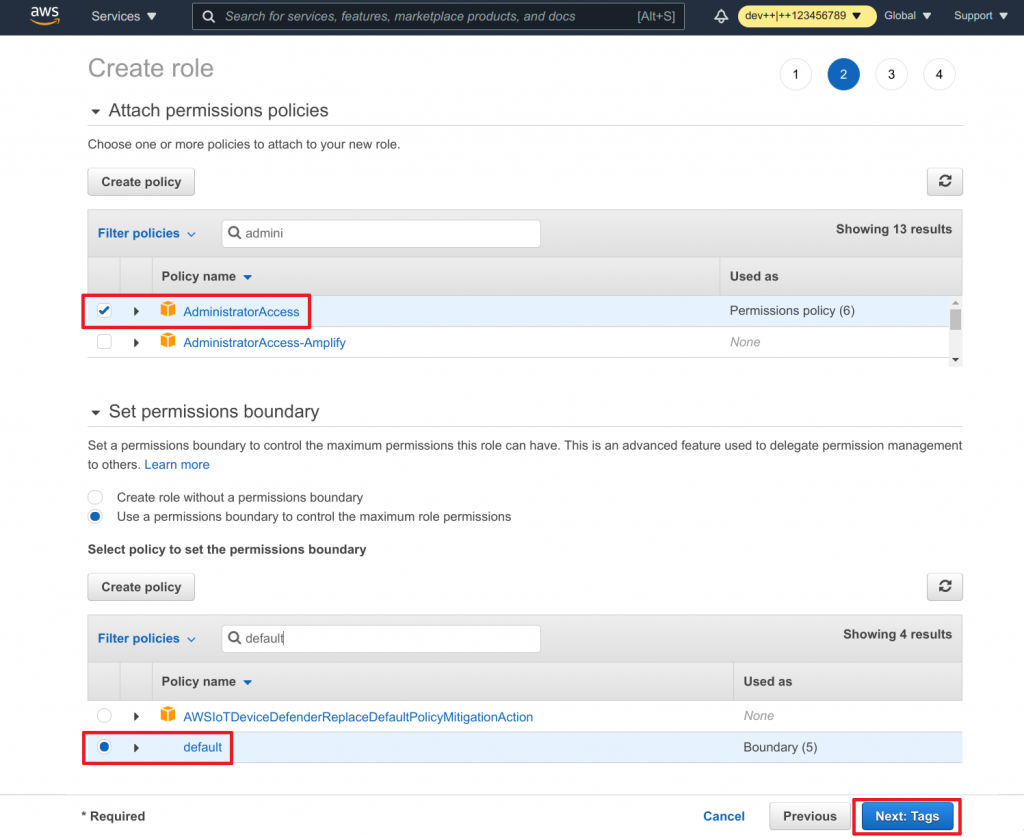
- Find and select the Administrator Access permission
- Find and select the rds-access permission
- Find and select the default Permission boundary
- Click on Next: Tags to continue
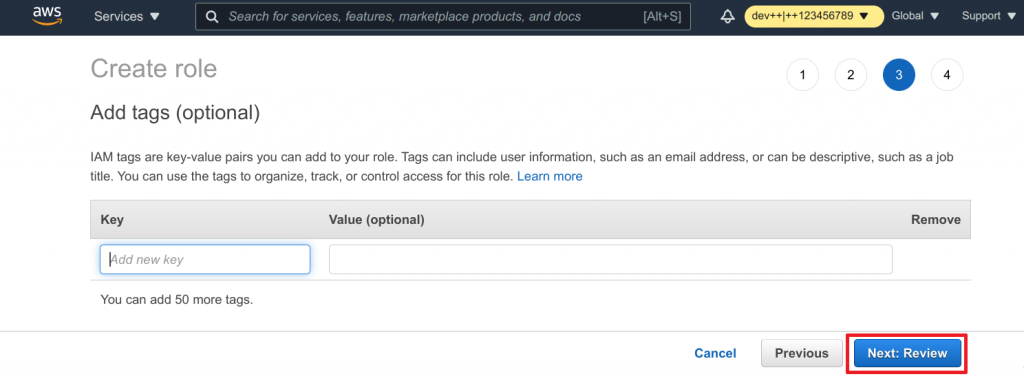
- Add any tags as desired
- Click on Next: Review to continue
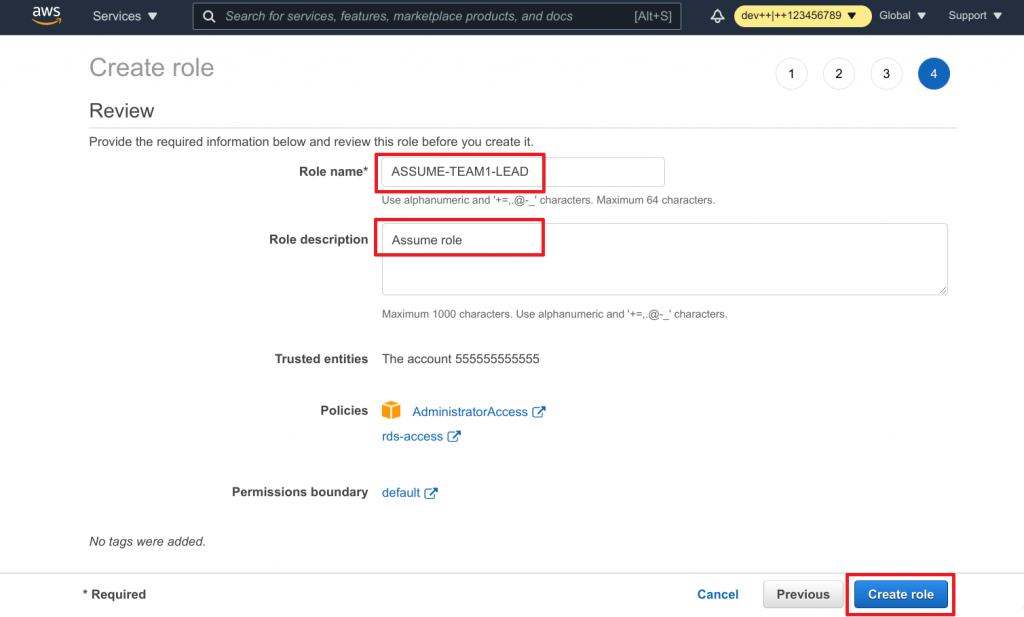
- Assign
ASSUME-TEAM1-LEADas the Name - Add a Description
- Review and click on Create role to finish the process
Link the role
As mentioned already a few times, it is not possible to set a specific role as a trusted identity to another role during the creation process. What AWS allows you is to set the account id only, meaning that the root use of that AWS account is set as the trusted entity. We however want to have our login role as the trusted entity. We can now fix this by editing the role again.
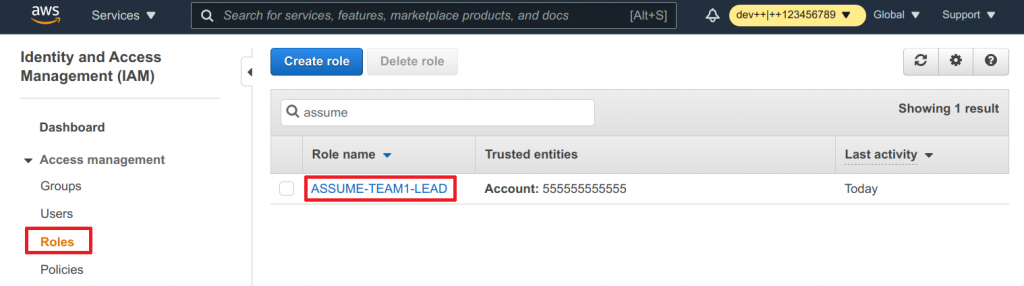
- Click on Roles
- Find your freshly created role via the search function
- Click on the role name to view it
- Switch to the Trusted relationships tab
- You can that our login account
555555555555is set to be trusted - Click on Edit trust relationships to change that
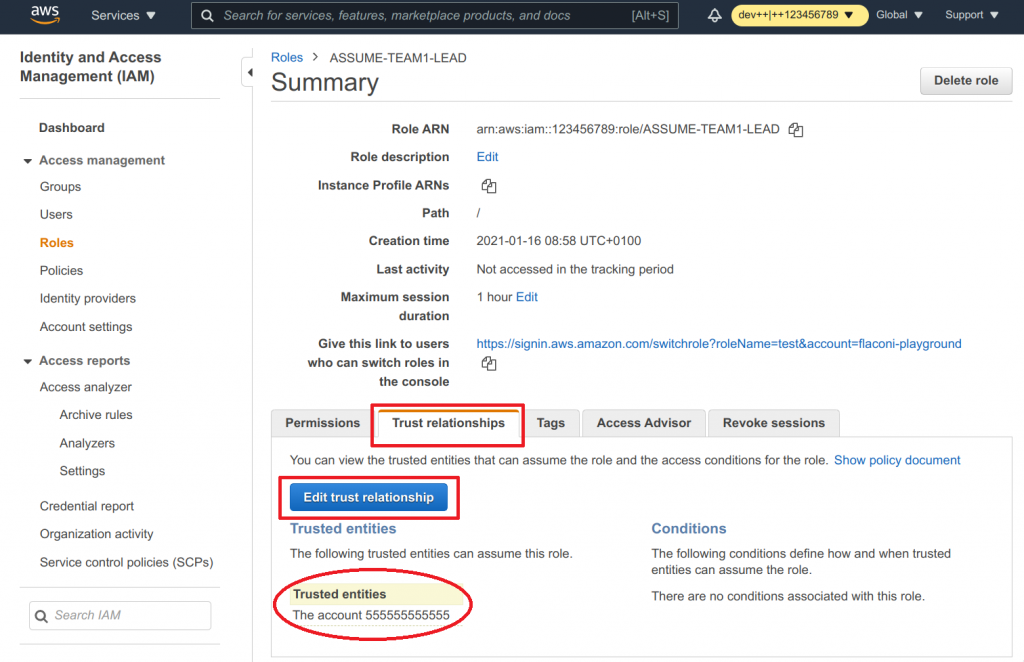
- Now you can actually see what AWS did here
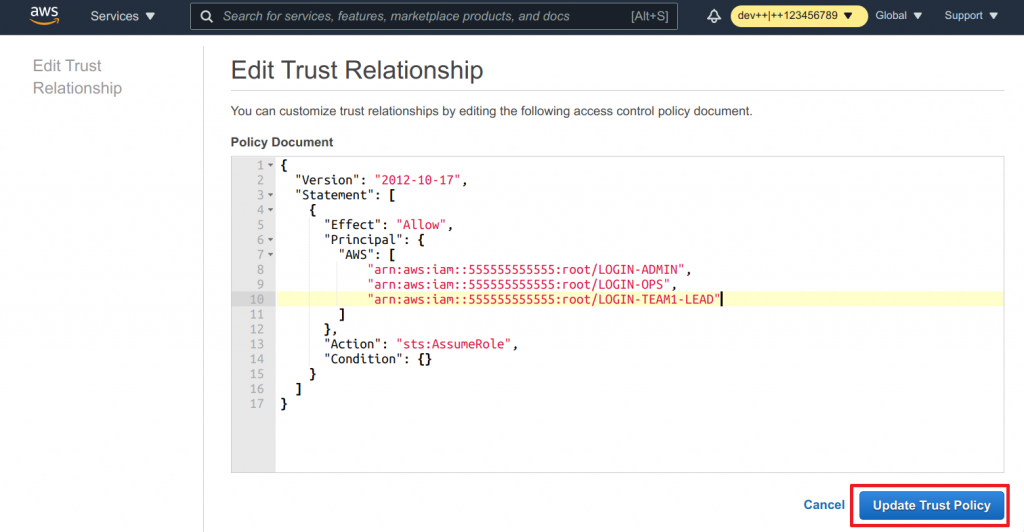
- Clear out the text field
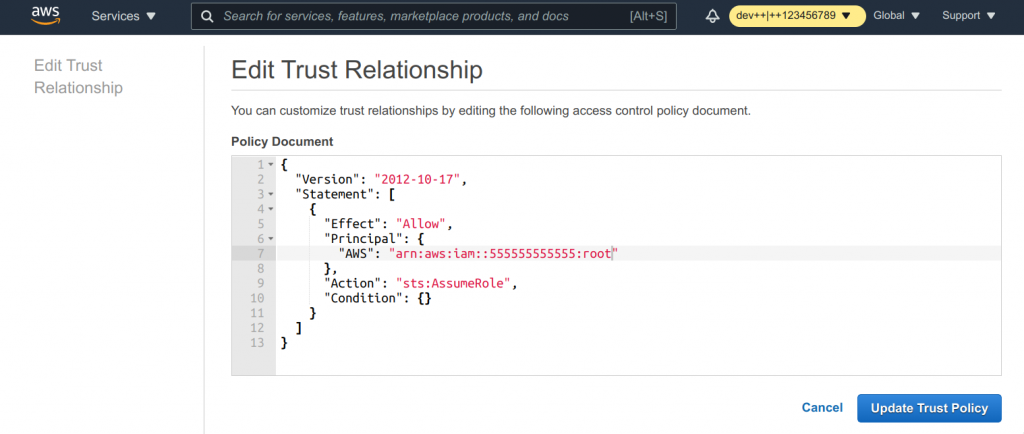
- Paste the following snippet into the text field
{
  "Version": "2012-10-17",
  "Statement": [
    {
      "Effect": "Allow",
      "Principal": {
        "AWS": [
          "arn:aws:iam::555555555555:role/LOGIN-ADMIN",
          "arn:aws:iam::555555555555:role/LOGIN-TEAM1-OPS",
          "arn:aws:iam::555555555555:role/LOGIN-TEAM1-LEAD"
        ]
      },
      "Action": "sts:AssumeRole",
      "Condition": {}
    }
  ]
}
Important: The 555555555555 is our fictitious AWS login account id. Replace that with your actual AWS login account id.
Why do we add three AWS principals?
Remember when we talked about making the one-to-many on AWS side? What that actually means is that this role can be assumed by whoever has initially assumed LOGIN-ADMIN, LOGIN-TEAM1-OPS or LOGIN-TEAM1-LEAD. This was also discussed at the beginning of this section why it makes sense for admins and ops to assume this role as well.
- Click on Update Trust Policy once you are done
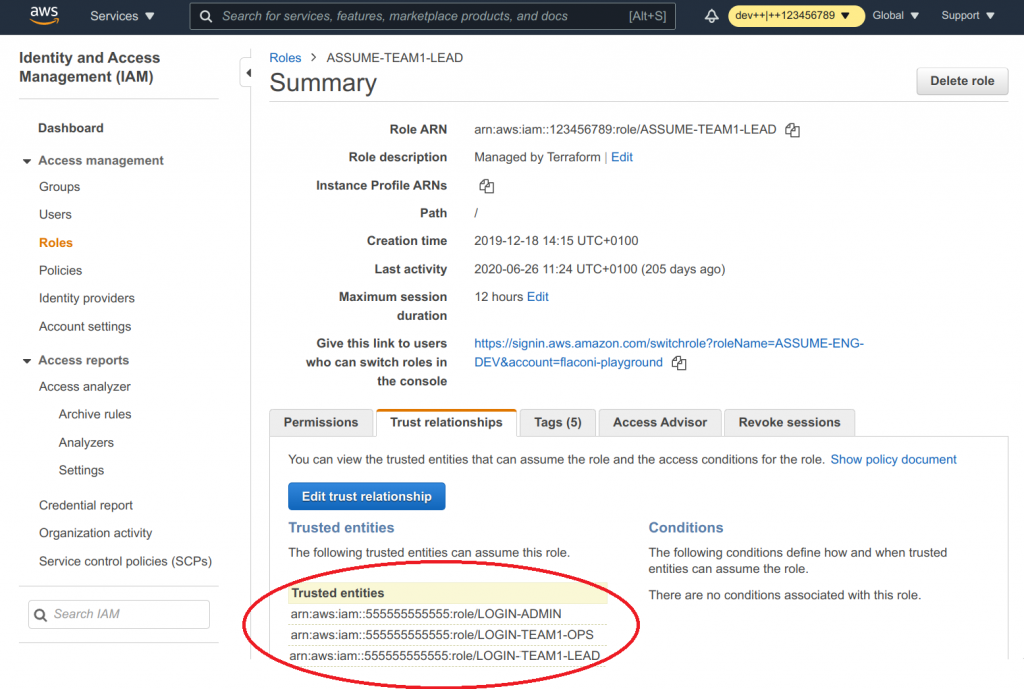
As you can see now, the correct trusted entity is in place.
Session duration
Let’s have a final word about session durations. Even though the setting shows a maximum duration of 12 hours, you only actually have a duration of 1 hour.
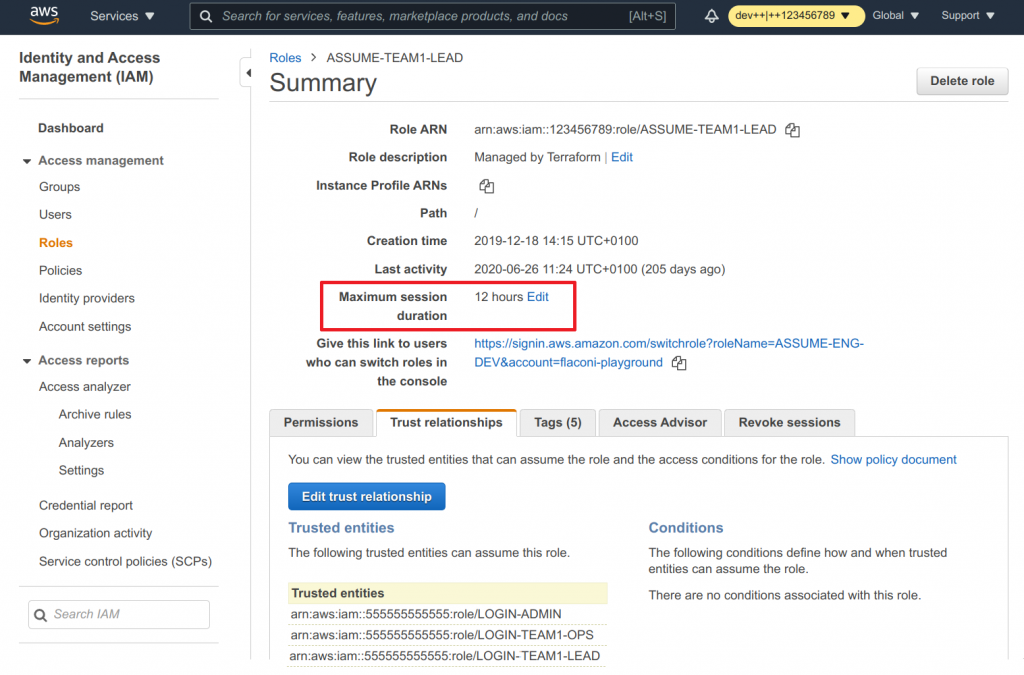
Why is that?
I honestly don’t know. Whenever you “assume” a role (at least from another role), AWS has a maximum session duration of just 1 hour, even if that is set to a higher value.
Summary
Let’s say you have about 20 AWS accounts and also 20 different roles for granular permissions. All that is left are 399 repititions.
4. TL;DR
/remind me about "adding tl;dr" in 5 days
5. References
- https://docs.aws.amazon.com/IAM/latest/UserGuide/access_policies.html
- https://docs.aws.amazon.com/IAM/latest/UserGuide/reference_iam-quotas.html
- https://docs.aws.amazon.com/IAM/latest/UserGuide/access_policies_boundaries.html
- http://awspolicygen.s3.amazonaws.com/policygen.html
- https://aws.amazon.com/premiumsupport/knowledge-center/users-connect-rds-iam/
- https://docs.aws.amazon.com/AmazonRDS/latest/UserGuide/UsingWithRDS.IAMDBAuth.IAMPolicy.html
- https://docs.aws.amazon.com/IAM/latest/UserGuide/id_roles_use.html#id_roles_use_view-role-max-session
.
Pingback: AWS Single Sign-On with AzureAD: AWS Account Structure - Everything CLI
Pingback: AWS Single Sign-On with AzureAD: Single Sign-On with SAML - Everything CLI